![]()
![]()
![]()
![]()
![]()
![]()
![]()
----------
![]()
|
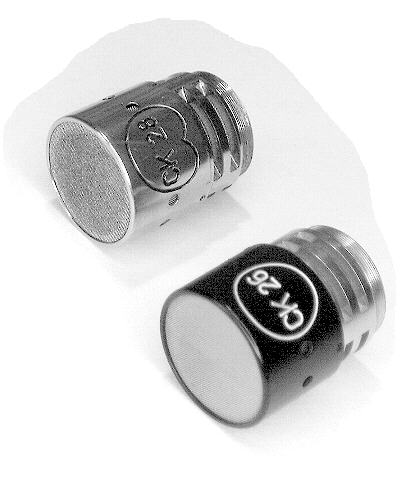
Curio's - AKG's CK26 & CK28 capsules |
|
|
A quick look at their history |
|
|
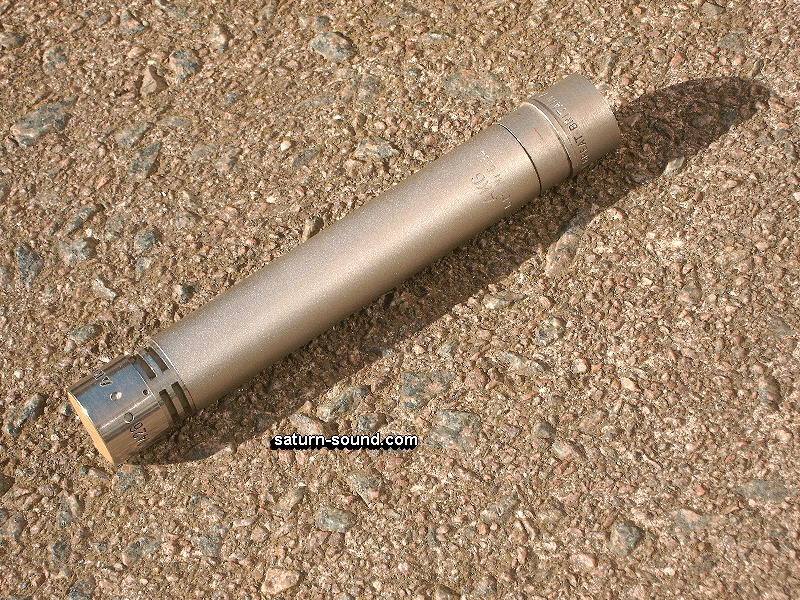
The CK26 (Omni) and CK28 (Cardioid) capsules, were the "Original Versions" of the CK1 (Cardioid) and CK2 (Omni) capsules that we know of today. |
|
|
Both the CK26 and CK28 capsules, were used with the ever popular V28 series microphone body i.e. Impedance Converter / Pre-amplifier, together with the A28 capsule adapter and either the GK26 (Black) or GK28 (Silver) Hood / Grill. See Component Parts. Then being known, as we can all relate to, as either the AKG C26 or the AKG C28 type microphone. |
|
|
Note - The AKG C29 comprises of the V28 / VR29 (Short extension Tube) components, together with either the CK26 or CK28 capsule. Likewise, the AKG C30 comprises of the V28 / VR30 (Long extension Tube) components, together with either the CK26 or CK28 capsule. Both combinations having the option of using the W17 Windscreen. |
|
|
The CK26 and CK28 capsules, were also used with the "Excellent" AKG C60, using the AC701 type valve, and the AKG C61, using the 7586 Nuvistor type, Impedance Converters / Pre-amplifiers. |
|
|
Of course, the CK26 and CK28 capsules will work equally as well on the "Versatile", and ever popular, CMS range of Impedance Converters / Pre-amplifiers, that were designed in the early 1970's e.g. AKG C451E etc. |
|
| Note the polar pattern is "Drawn" around the model type | |
|
"Little Treasure" ..... |
|
|
Few people are aware of, the excellent sound quality obtainable from the CK26, especially when it is used in conjunction with AKG's "Excellent" C60 Impedance Converter / Pre-amplifier. Those who do ..... just lap up the "Luxury" of the Telefunken AC701 valve and the "Smooth / Flat" response of the CK26 "Omni" capsule. The CK26 / C60 combination, is nothing short of a "Little Treasure" (Great for "Decca Tree" set-ups). |
|
|
Second-hand C28's ..... |
|
|
Whilst selling second-hand AKG C28's, I am very often asked "Has the microphone got the "Original" CK28 capsule, or has a CK1 been fitted". Although the CK26 (CK2) / CK28 (CK1) capsules are basically just old (new) versions of the same capsule, they do sound quite different. It therefore comes as no surprise to find out that the majority of engineers prefer the sound quality of the older CK26 and CK28 types, to that of the more modern CK1 and CK2 counterparts. |
|
|
Why is this ..... maybe it's due to the build quality ..... or maybe we just think the CK26 and CK28 ought to sound better, because they are older and have that certain something special about them. Who knows ..... I am sure we all have our own thoughts on the matter ..... so long as we enjoy what we hear, then surely that is all that matters. |
|
|
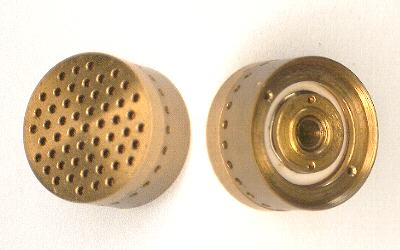
Let us now dismantle the CK28 Capsule, and see what we find ! |
 |
|
The CK28, or CK26, might appear to be just another ordinary small capsule. But I wonder if people are aware of the amount of component parts, and engineering, that goes into the making one of these little gems ? |
|
|
Although we are looking at the CK28 capsule, the CK26 is almost identical apart from the structure of the capsule back-plate and vent system. See later for more information. |
|
|
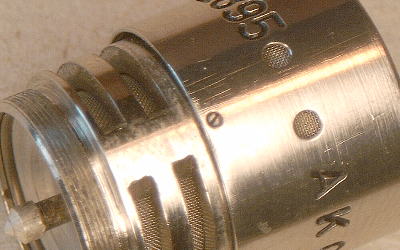
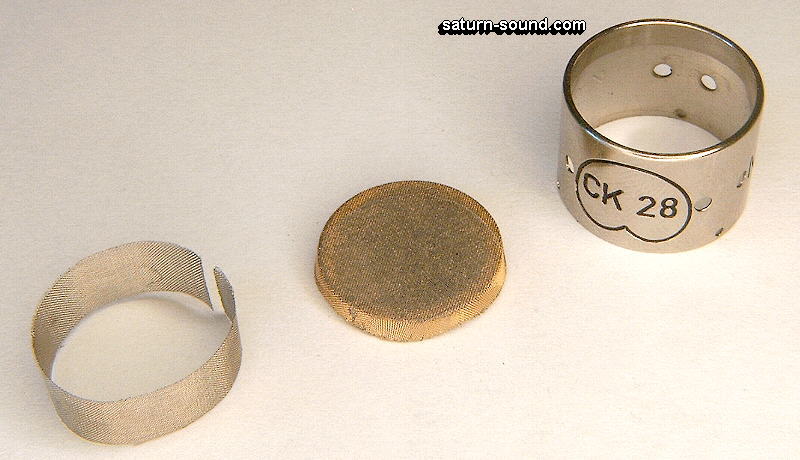
Once the capsule is removed from the associated Impedance Converter / Pre-amplifier, it can be carefully dismantled. We start by loosening the 3 small "Grub" screws around the base of the top half of the capsule assembly. |
|
|
The top half of the capsule assembly can now be carefully removed. |
|
|
One of the small "Grub" screws and Two of the "Air Vents" |
|
|
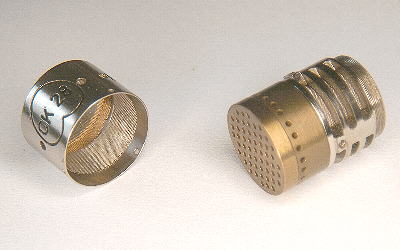
So now we have removed the top half (Grill) of the capsule assembly, we can see the "Capsule" element, together with the associated Mounting / Adapter assembly. |
 |
|
The "Grill" carries two sets of very fine wire mesh. One is fitted at the front entrance, to protect the capsule element, and the other is fitted around the inside of the housing, to protect the associated "Air Vents". These help to protect the capsule from dust etc. |
|
|
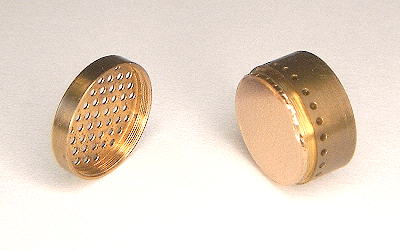
The capsule element, is fixed in place via a screw thread around the inside of the Mounting / Adapter assembly and is easily un-screwed from it. |
|
|
Top half or "Grill", removed from capsule assembly |
|
|
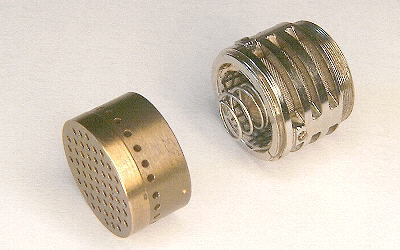
Once the capsule element is removed from the Mounting / Adapter assembly, we can see just how much work is in the Mounting / Adapter assembly. |
 |
|
I appreciate that the Mounting / Adapter assembly might not appear to have much influence on the sound of the CK28 capsule, but actually it does. |
|
|
The "Cavities", around the Mounting / Adapter, and "Mesh", that fits into the assembly, are all fine tuned to match the requirements of the capsule element. This being a part of the dampening system, to the rear of the capsule diaphragm. On the CK28 this is of prime importance, however, in the case of the CK26 it is purely cosmetic. As the CK26 capsule is a "Pressure" type transducer i.e. Omni pattern, with no rear venting system. |
|
|
Capsule element and Mounting / Adapter, separated. |
|
|
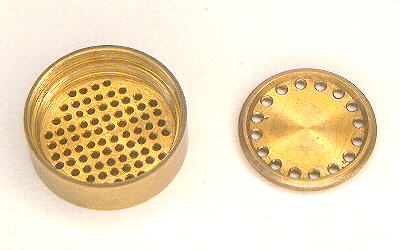
The Mounting / Adapter also carries the spring loaded electrode that makes contact between the capsule back-plate and the associated Impedance Converter / Pre-amplifier. |
 |
|
This area of the capsule assembly is very prone to dampness and dust build up, which can cause numerous "Noise" problems. |
|
|
All of the components, within this area, must be keep thoroughly clean and free from any form of foreign matter, as is practically possible. |
|
|
Components that make up the Mounting / Adapter |
|
|
At last we can turn our attention to the capsule element and study it's construction. |
 |
|
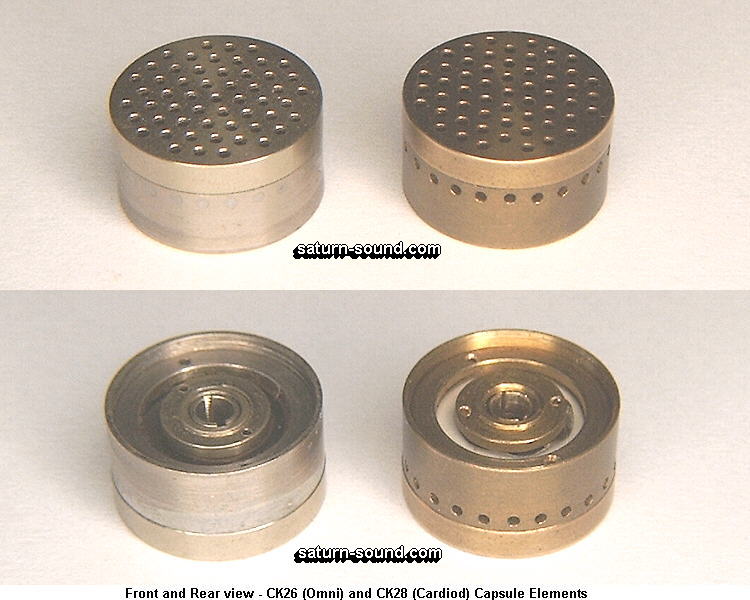
Like many capsules of this size, the diaphragm is protected by a brass cap, with many small holes in it. This, together with the holes around the circumference of the capsule housing, is all part of the Acoustic Tuning. All "Helping" to determine the desired frequency response, together with the accuracy of the polar pattern, produced by the capsule. |
|
|
Unlike the CK28 (Cardioid) capsule, the CK26 (Omni) capsule, has no vents around the circumference of the housing. |
|
|
To the rear of the capsule, we can see the electrical "Pick-up Point"" to the capsule element. This is hollow, thus being a part of the diaphragm rear damping / venting system. |
|
|
Front and Rear views of CK28 Capsule element |
|
|
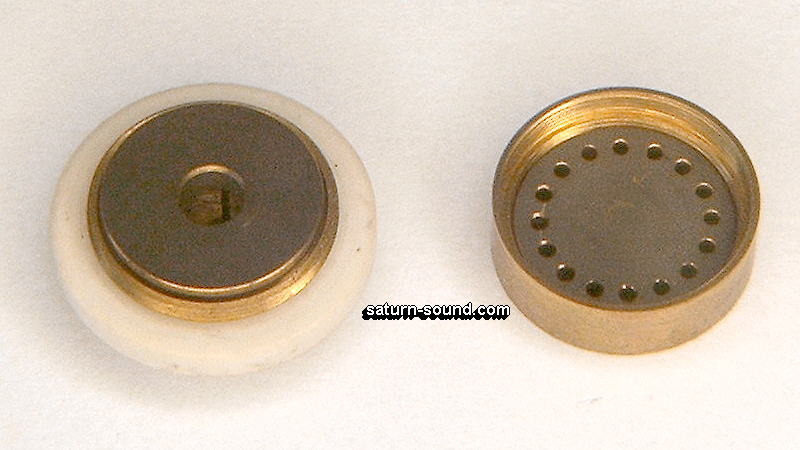
If we very carefully un-screw and remove the "Brass Cap", used to protect the diaphragm, then we have access the front face of diaphragm. This makes cleaning the diaphragm a simple procedure, unlike that of many other makes of "Small" capsules, where it is totally impossible to access the whole front face of the diaphragm. |
 |
|
The diaphragm is "Glued" to the capsule housing. Electrical contact to the diaphragm, is through the "Brass Cap" touching the front surface, outer edge / circumference, of the diaphragm. |
|
|
The "Brass Cap" is physically, and electrically, connected to the capsule housing. Therefore the whole of the capsule assembly / diaphragm , when connected to the Impedance Converter / Pre-amplifier, is at zero volts i.e. Earth. Thus, the diaphragm is less likely to attract dust etc. |
|
|
Brass "Protective" Cap removed to show the Diaphragm |
|
|
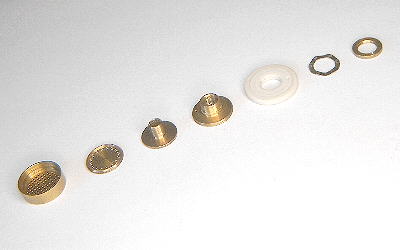
Behind the diaphragm, is the critical, "Back-plate / Electrode" assembly. |
 |
|
The "Back-plate / Electrode" assembly, is secured within the diaphragm housing, by a threaded "Fixing Ring". Once the fixing ring is un-screwed, then the back-plate / electrode assembly can be removed from the diaphragm housing. Together with the associated "Shims" and "Spring Washer". The "Shims" being used to determine the working distance, clearance, between the Back-plate and the Rear Face of the Diaphragm. The "Spring Washer" being used to "Lock" the assembly together. |
|
|
Initially we see that the back-plate / electrode assembly consists of a "Ceramic" insulating plate, supporting the Brass back-plate and electrode connector. It's a lot more complex than that !. |
|
|
Diaphragm and Back-plate / Electrode assembly |
|
|
When the Back-plate is un-screwed from the Electrode Assembly, we find that there is a second, brass disc, fitted inside the main Back-plate. This assists / helps in the Fine Tuning and Pattern Characteristics of the capsule. |
 |
|
The standard in engineering, and the associated precision, is incredible. Many modern day manufacturers could learn (Gain) a lot from such practices. Alas, the cost to produce a capsule of this quality would currently be financially unrealistic. |
|
|
Primary and Secondary Back-plate components |
|
|
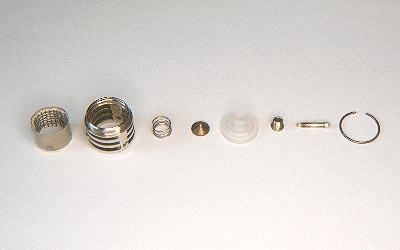
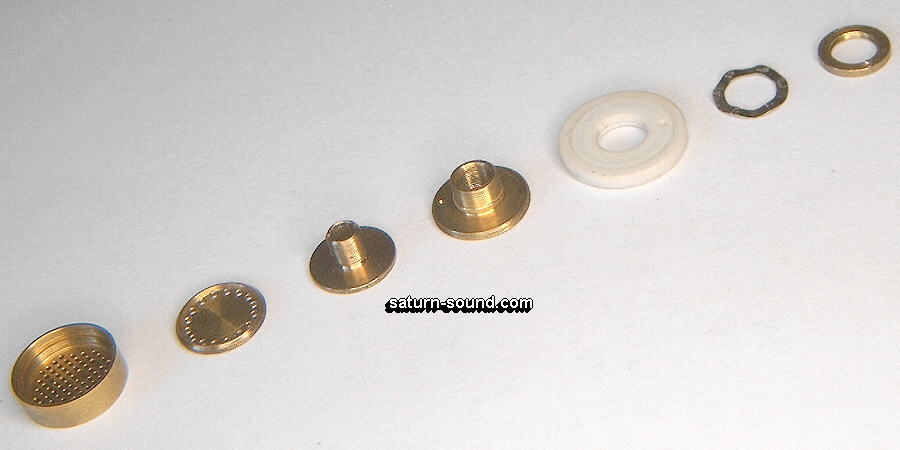
There are no less then seven parts, plus a very small locating ball, that go to make up the Back-plate / Electrode "Assembly", of the capsule. |
 |
|
Through the design of the CK26 and CK28 capsules, it can be seen, that it is possible to completely dismantle the capsule, down to the last "Nut and Bolt". Thus allowing excellent access for servicing, should the need arise. |
|
|
Again, like the mounting Ring assembly, all of the components, within the Back-plate / Electrode Assembly, must be keep thoroughly clean and free from any form of foreign matter, as is practically possible. |
|
|
Parts that make the Back-plate / Electrode Assembly |
|
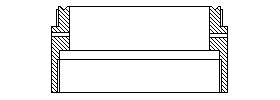
| Sectional View of the numerous component parts that go to make up a CK28 capsule | |
| Excluding the outer housing and mounting assembly shown above. | |
|
Diaphragm Protective Cap |
|
|
"Sputtered Gold" Diaphragm |
|
|
Main Housing |
|
|
"Primary" Back-plate |
|
|
"Secondary" Back-plate |
|
|
Back-plate "Acoustic Tuning Pipe" |
|
|
"Hollow" Back-plate Mounting Stud |
|
|
"Aluminum Foil" Rings (shims), as required |
|
|
Ceramic Insulator / Back-plate Carrier |
|
|
Steel "Shake Proof" Washer |
|
|
Back-plate, Locking Ring |
|
|
Phosphor Bronze "Shake Proof" Washer |
|
|
Back-plate Assembly, Locking Ring |
|
|
Sectional view of parts inside a CK28 capsule |
|
|
Sectional view of the above parts, assembled. to form the complete capsule. This is then fitted into the Housing and Mount assembly, to form the CK28, as we know it. |
 |
|
The size (Distance) of the "Air-gap" between the back of the "Diaphragm" and the front of the "Primary" Back-plate, is determined by the amount of "Aluminum Shims" used during manufacture and testing. |
|
|
By adjusting the position of Back-plate "Acoustic Tuning Pipe", then the pattern and frequency response of the capsule can be fine tuned. |
|
|
"The Heart" of a CK28 capsule |
|
|
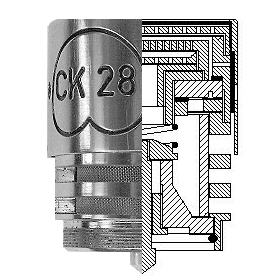
Finally, a "Cutaway / Sectional" view of the CK28 capsule. Showing how all of the many components fit together. Forming this magnificent piece of engineering. Somewhat different to that of the engineering skills used in the construction of the CK1 capsule that followed. |
 |
|
Considering the relatively small size of the CK26 and CK28 capsules, when compared to the dimensions of the CK12 for example, then the "Craftsmanship" required, during the design and manufacture, is probably the best we are ever likely to see. There are many similar sized capsules produced by other manufacturer's, but they are nowhere near so complex as the CK26 and CK28. |
|
|
"Cutaway / Sectional" view of a CK28 capsule |
|
| Note - Whilst dismantling the CK28 capsule, for photographing, I made a note of the number of "Parts" used to make the capsule. There being no less than 36 items, compared with some 15 parts that go to make the CK1. | |


